|
|
||||||||||||||||||||||||||||||||||||||||||||||||||||||||||||||||||
|
|
||
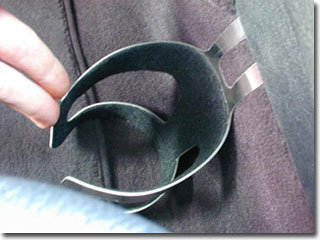
| Step 1 - Slip in | ||
|
|
||
|
|
Slip the top arm of the cupholder under and behind the edge of the center console approximately 1/4" to 1/2." It simply needs to slip under and past the plastic edge, and then immediately up. NOTE FOR BMW E39 5 SERIES: Although it can be positioned more to the front or rear if desired, an ideal location is above an area on the floor where there is a slight depression, just below where the rear edge of the carpeted bolster meets the plastic console (as shown in the picture). NOTE FOR BMW E46 3 SERIES: Lifting the edge of the console slightly as you insert the tab will make it easier to push the angled bend up and under the edge of the console. NOTE
FOR BMW E38 7 SERIES: The holder
installs in the same way under the lower edge of the carpeted bolster
which covers the full length of the console. When first inserting
the tab, make sure that you slip it behind both the bolster and
the edge of the console underneath so that the top tab is not visible
when installed. |
|
|
|
||
| Step 2 - Push up | ||
|
|
||
|
|
Press in and upward until the bends in the upper arm are pushed under the edge of the console approximately half way, and the holder is in a near-vertical position against the carpet over the transmission tunnel. Note that you'll be pushing the upper arm up behind the plastic of the console and padded noise insulation behind it. As you push, you may feel some resistance from the insulation and from the spring action of the bends in the upper arm; however, it should not require significant force. It may help to lightly depress the bends on the upper arm to help it slide in place more easily. If it seems very difficult to push in and up, stop and reinsert and try again, this time pushing in a more upward direction. If the angle is too low, you'll be pushing directly into the carpet along the side of the tunnel under the console.
If you still have problems, please contact me for assistance. |
|
|
|
||
| Step 3 - Seat against floor | ||
|
|
||
|
|
Press down until the bottom rear edge of the holder seats against the floor. The holder is designed to sit at a slight angle toward the console to provide additional depth and better hold containers. The bends in the top arm act in a spring-like fashion against the edge of the console to hold it in place. The edge of the console will deflect slightly from the pressure. This is by design and is intended to secure the holder as tightly as possible. The edge of the console will return to its original position when the holder is removed. When in place, the holder should fit flush against the floor at the rear edge, with the front of the arms slightly off of the floor. It should not move easily in a forward or rearward direction, and it should spring back slightly toward the console if the arms are pulled out gently toward the door. To
remove, simply grab it at the bottom, and pull it out and down. |
|


Want great tools
from SK Facom, Ingersoll-Rand, and others at great prices?
Please visit my site
ToolWerkz.com
![]()
Copyright
© 2016 by Netropy LLC. All Rights Reserved.
U.S. and International Patents Pending.
"UltimateCupholders.com," "Ultimate Cupholders,"
"Ultimate Cupholder," "Ultimate Cup Holders," Ultimate
Cup Holder,"
and the Ultimate Cupholders logo are trademarks or registered trademarks
of Netropy LLC.
All other trademarks, servicemarks, and/or copyrighted materials that
may appear on this site
are the property of their respective owners.